Set up the integration with SITS:Vision to create a secure connection between the SITS:Vision database and Admissions using the Microsoft integration runtime. Then, import applications and reference data using Azure pipelines.
For the host server, you must also ensure the following:
Meets the minimum system requirements as described on the Microsoft website: Integration runtime

Has access to the internet as described on the Microsoft website: Integration runtime firewall and ports
Does not hibernate. If the server hibernates, the connection between SITS and Admissions is lost.
Before setting up the Microsoft integration runtime, you require the following:
-
An account with the permissions to use the application Edge admin so that you can access System admin.
-
A copy of the SQL script file
on-premise-permissions-sql-server.sqlor Oracle script fileon-premise-permissions-oracle.sql. -
The account and connection details for the SQL Server or Oracle database as detailed in the table Account and connection details:
Account and connection details Database Details Notes acronymSQL Username Username of the database account, such as tribaledge.Password Password of the database account. Server Fully qualified domain name of the server, such as sqlserver.university.ac.uk.Database name Database name, such as SITSDatabase.Oracle Username Username of the database account, such as tribaledge.Password Password of the database account. Host Fully qualified domain name of the host, such as oracle.university.ac.uk.Port Port number, such as 1521.Service name Service name, such as SITSDatabase.
If the host server uses a proxy server to access the internet, you may also require the following:
-
Address and port number of the proxy server, such as
proxy.university.ac.ukand port number8080. -
Username and password of an account that is authorised to access the internet through the proxy server.
Then, install the Microsoft integration runtime and set up the connection between SITS and Admissions using the SQL or Oracle script file.
Install the Microsoft integration runtime
Install the Microsoft integration runtime on the host server as follows:
-
Sign into the server as a user with the rights to install software.
-
Download the latest version of the Microsoft integration runtime. For example,
IntegrationRuntime_x.xxx.msi, wherex.xxxis the version number, from the Microsoft website: Integration runtime download -
Run the Microsoft integration runtime file. You are prompted to choose the language and installation location.
-
Wait while the Microsoft integration runtime is installed and then select Finish to complete the installation.
The Microsoft integration runtime configuration manager opens automatically, as shown in the image Integration runtime configuration manager.
Integration runtime configuration manager 
-
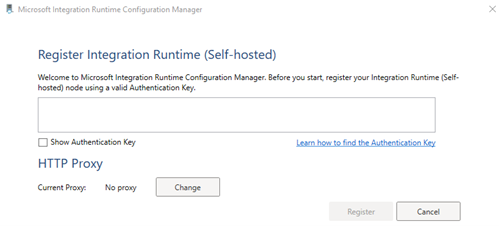
Optionally, define the proxy server. On the Integration runtime configuration manager, select Change and then enter the address, port, and user account for the proxy server.
-
Get an authentication key. Go to System admin and then Integrations and then Authentication keys and select
 for Authentication key 1. Note that Authentication key 2 can be used later when you need to change the keys to maintain security.
The image Authentication keys shows the authentication keys.
Authentication keys 
-
Register the authentication key. Go to the Integration runtime configuration manager and paste the authentication key into the text box then select Register, as shown in the image Register authentication keys.
Register authentication keys 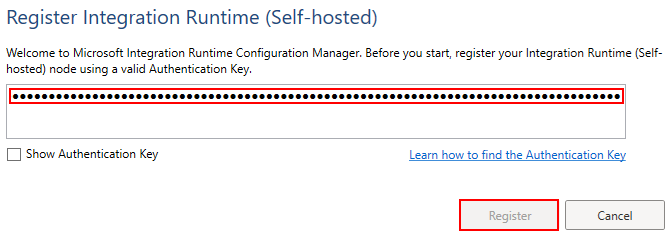
-
Check that the authentication key has registered successfully, as shown in the image Registered successfully.
Registered successfully 
-
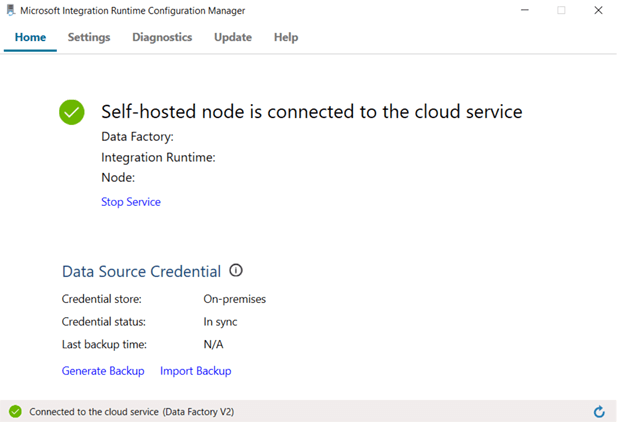
On the server, go to the Microsoft integration runtime configuration manager to check that the status is connected, as shown in the image Connection status.
Connection status 


Set up the connection between SITS and Admissions
Set up the connection between SITS and Admissions using the SQL or Oracle script files as follows:
SQL Server
Use the SQL script file on-premise-permissions-sql-server.sql to create a database account with the required SITS database table permissions or to assign the required permissions to an existing account. Then, add the database details to the integration in System admin.
Set up the connection between acronymSITS and Admissions as follows:
-
Copy the script file
on-premise-permissions-sql-server.sqlto the server. -
Use a text editor, such as Notepad++, to edit the parameters section of the SQL script file
on-premise-permissions-sql-server.sqlas follows:- Username and password
- For a new database account, add the new username and password.
- For an existing database account, add the username and exclude lines 26 to 50.
- Schema
- Defines the schema owner, change if you are not using the default of
dbo.
The image SQL Script file parameters details the
tribaledgeaccount details anddboschema in Notepad++.SQL script file parameters 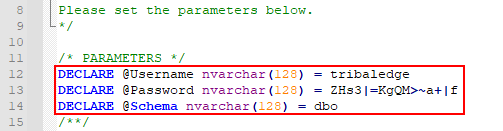
-
Use SQL Management Studio to run the SQL script.
The message Committed changes indicates that the SQL script has run successfully.
-
Go to Settings and then Integrations and then Database settings and add the account and connection details for the SITS database as detailed in the table SQL account and connection details to add.
SQL Server account and connection details to add Details Notes Username Username of the database account, such as tribaledge.Password Password of the database account. Server Fully qualified domain name of the server, such as sqlserver.university.ac.uk.Database name Database name, such as SITSDatabase.Note that the account and connection details are encrypted and stored securely in Admissions and the Microsoft integration runtime.
-
Go to System admin and then Integrations and then Pipelines and then Time zone and select the time zone for the institution. Note that you must select the same time zone as the institution's SITS database. This ensures that any errors relating to the SITS data are displayed with the correct time for troubleshooting.
For example, select Dublin, Edinburgh, Lisbon, London (UTC+00:00) for an institution with an on-premises SITS database in the UK.

Oracle
line overflow during variable substitution error. This is due to a limitation in command-line size. If you have this issue, manually enter line breaks after approximately every 20 tables, to run the script.Use the Oracle script file on-premise-permissions-oracle.sql to assign the required SITS database table permissions to an existing account. Then, add the database details to the integration in System admin.
The script file cannot be used to create a database account.
The script file must be run as the schema owner.
Use an account that does not have any other permissions on the SITS database.
Set up the connection between SITS and Admissions as follows:
-
Copy the script file
on-premise-permissions-oracle.sqlto the server. -
Use a text editor, such as Notepad++, to edit the parameters section of the Oracle script file
on-premise-permissions-oracle.sqlas follows:- Username
- Add the user name of the existing database account. Note that the account password is not required.
- Schema
- Define the database schema, such as
dbo.
The image Oracle script file parameters details the
tribaledgeaccount details anddboschema in Notepad++.Oracle script file parameters 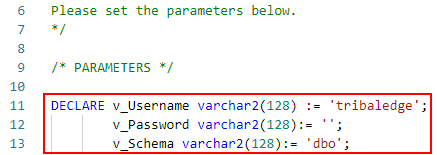
-
Use Oracle SQL developer or SQL Plus to run the Oracle script.
The message Committed changes indicates that the Oracle script has run successfully.
-
Go to Settings and then Integrations and then Pipelines and then Database settings and add the account and connection details for the SITS database as detailed in the table Oracle account and connection details to add.
Oracle account and connection details to add Details Notes Username Username of the database account, such as tribaledge.Password Password of the database account. Host Fully qualified domain name of the host, such as oracle.university.ac.uk.Port Port number, such as 1521.Service name Service name, such as SITSDatabase.Note that the account and connection details are encrypted and stored securely in Admissions and the Microsoft integration runtime.
-
Go to System admin and then Integrations and then Pipelines and then Time zone and select the time zone for the institution. Note that you must select the same time zone as the institution's SITS database. This ensures that any errors relating to the SITS data are displayed with the correct time for troubleshooting.
For example, select Dublin, Edinburgh, Lisbon, London (UTC+00:00) for an institution with an on-premises SITS database in the UK.
