Set up applicant portal registration to enable applicants to register or log in to the applicant portal using their own email address, such as Gmail or Outlook.
To set up applicant portal registration, complete the following steps:
-
Set up Entra External ID to create a tenant and the user flow to sign up and sign in, and to reset passwords.
-
Set up the applicant portal as an application in Entra External ID.
-
Send the required details from Entra External ID to Tribal.
-
Set up Admissions to add the authorisation group and check the related communications templates.
Before setting up applicant portal registration, you require the following:
-
An Azure account with administrative permissions to create an Entra External ID tenant, register an application, manage resources, and client keys.
-
The tenant name for the institution. If you do not know the tenant name, contact Tribal support.
-
An account to create a Remedy Force support call with Tribal to complete the set up of Entra External ID with Admissions.
-
An Admissions account with permissions to manage communications templates.
Set up Entra External ID
You can go to the section Set up the applicant portal as an application if you are already using Entra External ID. For example, to allow applicants to register or log in to complete an application form through the institution's website.
Set up an Entra External ID tenant and then set up the user flows.
Set up the tenant
Set up the Entra External ID tenant as follows:
-
On the Azure portal, select Create a resource and then select Azure Active Directory B2C.
-
Enter the required values as defined in the table Azure Active Directory B2C details.
Azure Active Directory B2C details Field Value Organization name
Enter the organisation name using the syntax: [Region] [Environment] B2C - [Tenant name], where:
-
[Region] is the region such as EMEA
-
[Environment] is the environment such as Production
-
[Tenant name] is the tenant such as hessle.
For example,
EMEA Production B2C - hessle.Initial domain name
Enter the initial domain name using the syntax: [RegionPrefix][Environment]b2c[Tenant], where:
- [RegionPrefix] is the region such as emuk for EMEA UK
-
[Environment] is the environment such as production
-
[Tenant name] is the tenant such as hessle.
For example,
emukproductionb2chessle.Country and region
Select the appropriate value for the institution, such as United Kingdom.
Subscription and resource group
Select the appropriate subscription and resource group for the institution.
-
-
Depending on your account settings, you may need to disable the security defaults as these can enforce MFA (multi-factor authentication). For more information, go to Security defaults in Microsoft Entra ID.
Set up the user flows
Set up the users flows to enable applicants to register, log in, or reset their password as follows:
-
On Azure Active Directory B2C, go to User flows and then select New user flow.
-
Create the user flow to register and log in. Select Sign up and sign in and then Recommended. Then, the user flow and enter or select the values shown in the table Registration and log in.
Registration and log in Field Description Name Enter the name of the user flow, such as signupsignin.Identity provider Select Email signup. User attributes and token claims Select Given name, Surname, and Email address. -
Create the user flow to reset passwords. Select Password reset and then Recommended. Then, the user flow and define or select the values shown in the table Password reset.
Password reset Field Description Name Enter the name of the user flow, such as passwordreset.Reset password using email address Set to Enabled. Application claims Select Users object ID. -
Make a note of the name of the user flows to send to Tribal in the Send details to Tribal section.
Set up the applicant portal as an application
Set up the applicant portal as an application in Entra External ID and then create the client secret key.
Set up the applicant portal as an application
Set up the applicant portal as an application in Entra External ID as follows:
-
On the Azure portal, select the directory that contains your Entra External ID tenant. Then, go to Application registrations and then select New application registration.
-
Enter the name of the application, such as ApplicantPortal.
-
Select the supported account types, Accounts in any identity provider or organizational directory (for authenticating users with user flows).
-
Define the redirect URIs that return the authentication response to Admissions, as detailed in the table Redirect URIs.
In the URIs, region is the geographical region of the institution, such as
APAC, andtenantnameis the institution’s tenant name, such ascaltech.Attention.Redirect URIs must be HTTPS, are case-sensitive, and must match exactly. Avoid using special characters.
Redirect URIs Type URI Description Web https://identity.tribaledge.com/region/tenantname/connect/callbackAlways required. Web https://identity.tribaledge.com/region/tenantname/signin-oidc-ADFSRequired when using ADFS (Active Directory Federation Services). -
Select Grant consent for openid and offline access permissions.
-
Select to register the application, as shown in the image Register new application.
Register new application 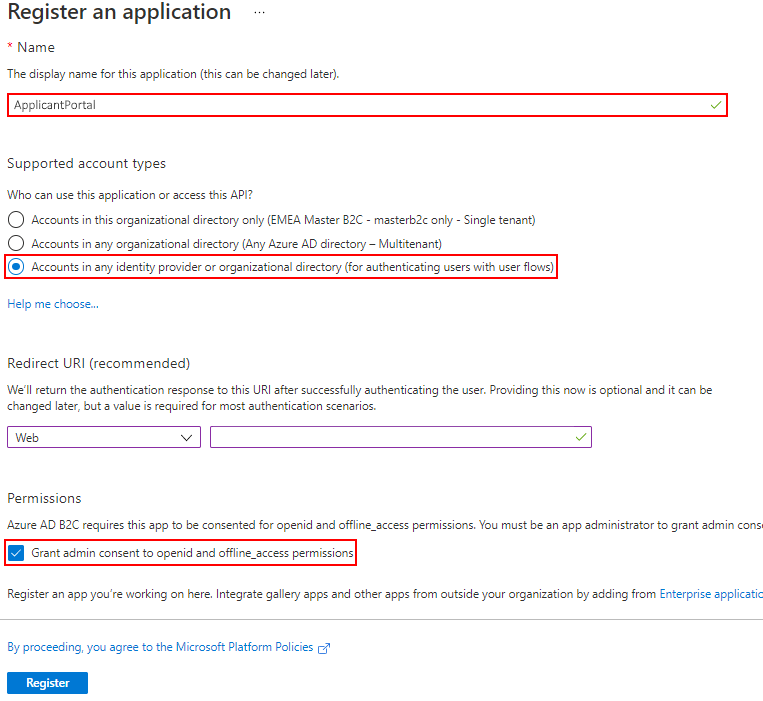
Create the client secret key
Create the client secret key as follows:
-
Create the client secret key. On Application registrations, go to Certificates & secrets and then select New client secret.
Define the name of the client secret key, such as
Applicant portal client secret, and select the expiry duration of the key, such as24 months.A new client secret key must be sent to Tribal before the expiry date to prevent service interruption. -
Make a note of the following values to send to Tribal in the Send details to Tribal section:
-
Application identifier
-
Directory identifier
-
Client secret key
-
Send details to Tribal
Tribal must configure Admissions to securely connect Entra External ID to the applicant portal. Therefore, you must provide Tribal with the configuration details shown in the table Entra External ID to Admissions configuration values.
-
If you are setting up Admissions for the first time, you should supply the configuration details when completing the document Tribal Edge Core Branding & Pre-Requisite Template, which is available on Tribal Communities.
-
If you are setting up Entra External ID after setting up Admissions, you must create a Remedy Force call to provide the configuration details.
| Value | Description |
|---|---|
|
Client identifier and client secret |
Client ID and Client secret from the Applicant portal application registration in Azure Active Directory B2C. For example, |
|
Sign up and sign in user flow |
Name of the sign up and sign in user flow, such as Authority used for the sign up and sign flow, that includes the Initial domain name and name of the user flow. For example, |
|
Password reset user flow |
Name of the password reset user flow, such as |
Set up Admissions
Set up the required authorisation group, optionally preconfigure users from other systems, and then check the related communications templates.
Set up authorisation group
Set up the authorisation group for applicants and then enable the group to be assigned to an applicant as follows:
-
Log in to Admissions using an account with permissions to manage authorisations, such as an account in the EdgeAdministrator group.
-
Optionally, if you have not set up an authorisation group for applicants, add an authorisation group. For example, Applicants. For more information on authorisation, go to What is authorisation?
-
Enable the group to be assigned to applicants. On System admin, go to Integrations and then Authorisation management. Select
 and then select the Group, such as Applicants.
Attention.For full details on adding app roles and claims in Entra External ID, go to Configure tokens in Azure Active Directory B2C.
Preconfigure users
You can preconfigure users that have already registered for Entra External ID. For example, users who have registered with your institution to submit an application form. Therefore, to avoid these applicants having to register again, the users can be preconfigured with the role that enables them to access the applicant portal.
Users that have already registered with Entra External ID can be preconfigured using the integrations API Users, which is available in Person under the Admissions category. For more information, go to the API catalogue.
Check the communication templates
Check the communications templates, go to Admissions settings and then Communications templates and check the following are shown:
-
Application acknowledgement template
-
Applicant portal registration email template
If the communications templates are not shown, select to sync the new templates to Admissions.
Customisation
You can customise the communication templates and the Entra External ID registration and sign-in pages as follows:
-
The text of the communication template can be customised to meet the requirements of your institution.
-
The user flow pages for applicants to register and sign in can be customised for your institution’s branding. For more information, go to Customize the neutral branding in your external tenant.